When Adobe announced the PDF file format as an open document standard in 1993, it was meant finally to usher in the era of the “paperless office.” Despite the success of PDF as a platform-independent document format, we are still printing to paper—a lot. According to The Paperless Project, paper usage is increasing in American businesses at a rate of 22% a year, and the average office worker uses a “staggering” 10,000 sheets of copy paper annually.
This poses a unique challenge to publishers, who increasingly depend on the usage data and analytics which digital documents can provide, but not printed documents. For example, if a publisher sells a subscription of valuable research reports to one employee at a company, how do they know that employee isn’t printing out hundreds more copies, depriving the publisher of that additional subscription revenue?
Encrypting those research reports so that only the original subscriber can access them makes it harder for a user to share access to the digital version. FileOpen makes it possible to disable printing entirely, but if you allow the document to be printed and want to solve the rogue printing problem, you’ll need to take advantage of FileOpen’s advanced printing restrictions and watermarking features.
In this post we’ll walk you through how to limit printing of FileOpen-protected documents, and how to impose unique watermarks on each printout with user-identifying data. Using “dynamic” watermarks, you can auto-generate watermarks at the time of encryption and delivery, to include rich data which could be used to track a printout back to the user, time and device on which a document was printed.
How to Control Printing
In FileOpen RightsManager and RightsServer, you set printing permissions according to the access control policies you define for your different groups, or recipients. So rather than assigning printing restrictions to the actual documents, you can give different recipients different levels of printing privileges to the same document.
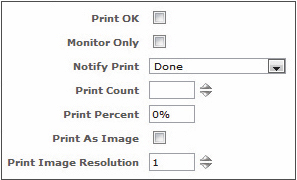
Your options for restricting printing are:
- Enable/disallow any printing
- Set a notification when a document has been printed
- Set the maximum # of print copies allowed
- Specify which pages or page-ranges can be printed
- Restrict printing to only physical devices (no print-to-file), or only to specific “whitelisted” printers
- Set a percentage of the document you will allow to be printed
- Print documents as lower resolution images so they are a degraded version of the original
- Simply monitor printing activity, without limiting # of prints or prohibiting any print drivers
All of the above printing permissions require that the end-user be online. RightsManager and RightsServer also have offline permission settings, which can be used to allow or disallow offline printing, and to cap the number of prints allowed while the user is offline.

FileOpen RightsManager offers a great deal of flexibility over printing, including the ability to render printouts in a lower resolution.
You don’t have to set printing restrictions in order to use watermarks, but they add an additional layer of control to your valuable documents. Now, let’s move on to adding watermarks.
How to Add Watermarks
Prior to the development of the current FileOpen watermarking mechanism, some implementations of the system added watermark text to a PDF prior to encryption, then encrypted that PDF uniquely for a specific user. We refer to this as Static Watermarking and Dynamic Encryption. That is, the watermark text is static (always remains the same as what was imposed originally), and the encryption is done in real-time, or dynamically.
The current system implements Dynamic watermarks, and can be used either with Dynamic or with Static Encryption. That is, the text of the watermark can change each time the document is opened, and this can be the case whether the same encrypted PDF is opened by multiple users, or a unique encrypted PDF is created for each user.
Within any particular watermark policy, there is a similar distinction between static and dynamic text, both of which can be used simultaneously on the same document:
Static Watermark Text: These contain information you define in advance when you are setting up permissions policies for your recipients. They can contain a copyright message or any text you please. This text is literal, i.e what is specified in the policy is imposed into the watermark.
Dynamic Watermark Text: Dynamic watermark text is generated “on-the-fly” when a user opens or prints a document. This text typically contains information specific to the user, e.g. name or email address. This information is retrieved from the PermissionServer database and sent to the Client as part of the document open or print control event, so can be changed even after document delivery, e.g. for example to notify an end-user that a newer version of the document is available. FileOpen SDK licensees can take advantage of a rich syntax to dynamically place watermarks using data such as the machine ID of the user, IP address, and printer name/port that they used.
For the purposes of this post, we’ll walk through the process of generating watermarks using the WebUI of FileOpen RightsManager and RightsServer.
1. Create a Watermark Layout Template
The first step is to configure a Layout Template for your watermark (Watermarks > Layout Templates > Add Layout Template). Here you can choose whether to make your watermark a “Stamp”, in which case it will be superimposed on top of the document contents, or a watermark that is imposed beneath the text of the document. You can also define the watermark’s type (header, footer, diagonal up, diagonal down, vertical left up or vertical right down), the font (also the size/fill-color RGB, stroke width, stroke color RGB) and the aligment (left/right/center).
2. Create a Text Template
Next, create a Text Template to define the content of your watermark (Watermarks > Text Template Sets > Add Text Template Set). Here you can choose whether to date and time stamp each printout, include user-identifying information, etc. User-identifying information can include their email address, username, full name, company, IP address, printer ID, and many more data points.
Together, your Watermark Layout Template and your Text Template make up a Watermark Set.
3. Apply a Watermark Set to a Policy
Navigate to Policies > Watermarks. Click on the Policy Set you want to apply your Watermark to. For example, you might have a Policy Set for a site-license subscription, and want to add the watermark to all documents associated with that policy.
Applying watermarks at the Policy level frees you from having to create multiple different versions of the same document, because the watermark floats above the document as a separate object, and can be changed or removed even after delivery. When you assign your watermark to a Policy, you can define a different watermark for digital viewing and print, or only include the watermark on the printed version.
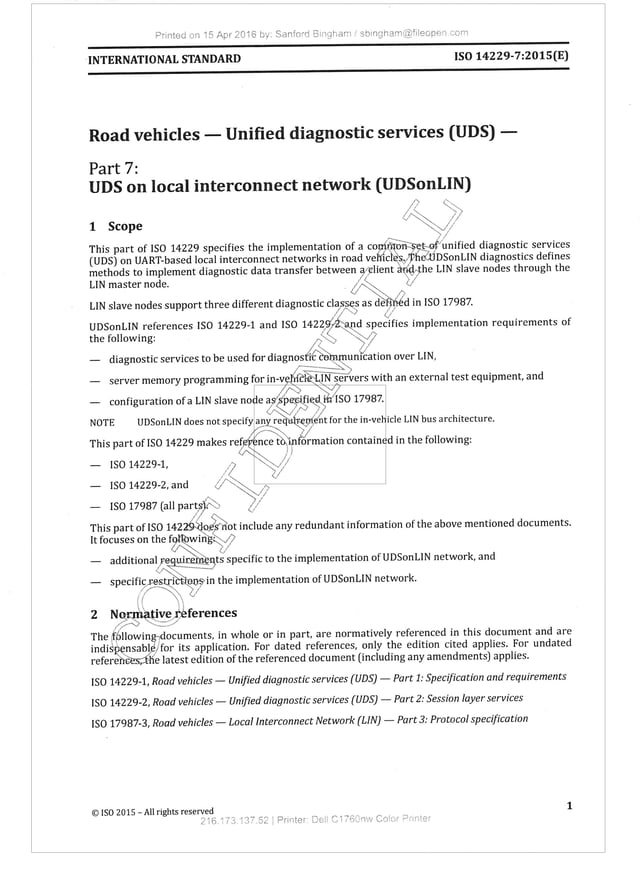
Here is an example of what your watermarks will look like on the resulting document:

This example shows a printed PDF with both static and dynamic user-generated watermarks, visible in the header and footer of the page.
You can make your watermarks as noticeable or unobtrusive as you like using the design controls in Watermark Layout Template dialog.
The Result: Smart Printed Documents
By leveraging FileOpen’s print controls and watermarking features, you can close the loop on unwanted printing and reproduction of your documents. Including unique user-identifying data in your watermarks will render every printed copy of your document traceable back to the original user—even copies made with a photocopier. Because the watermarks appear below the text, they cannot be “whited out” without visible degredation of the document content. Watermarks not only reinforce your permission policies on the printed page, they provide you with actionable data on how your valuable and confidential documents are being used.
FileOpen’s print control and watermarking features are bundled with our RightsManager, RightsServer and SDK products for encrypting and controlling access to documents. FileOpen watermarks can be used on native PDF files for viewing/printing in Adobe Acrobat and Adobe Reader(end-user plug-in required), and on OPN files for viewing/printing in any web browser with no plug-in required.
Contact Us for a demonstration and consultation of FileOpen's watermarking and security features.
